Walkthrough
Contents
Walkthrough#
To get it, you first see it, and then let it go
In this tutorial 🧑🏫, we’ll step through an Earth Observation 🛰️ data pipeline
using torchdata and by the end of this lesson, you should be able to:
Find Cloud-Optimized GeoTIFFs (COGs) from STAC catalogs 🥞
Construct a DataPipe that iteratively reads several COGs in a stream 🌊
Loop through batches of images in a DataPipe with a DataLoader 🏋️
🎉 Getting started#
These are the tools 🛠️ you’ll need.
# Geospatial libraries
import pystac
import planetary_computer
import rioxarray
# Deep Learning libraries
import torch
import torchdata
import zen3geo
Just to make sure we’re on the same page 📃, let’s check that we’ve got compatible versions installed.
print(f"pystac version: {pystac.__version__}")
print(f"planetary-computer version: {planetary_computer.__version__}")
print(f"torch version: {torch.__version__}")

print(f"torchdata version: {torchdata.__version__}")
print(f"zen3geo version: {zen3geo.__version__}")
rioxarray.show_versions()
pystac version: 1.6.1
planetary-computer version: 0.4.7
torch version: 1.12.1+cu102
torchdata version: 0.4.1
zen3geo version: 0.4.0
rioxarray (0.12.0) deps:
  rasterio: 1.3.2
    xarray: 2022.6.0
      GDAL: 3.5.1
      GEOS: 3.10.2
      PROJ: 9.0.1
 PROJ DATA: /home/docs/checkouts/readthedocs.org/user_builds/zen3geo/envs/v0.4.0/lib/python3.10/site-packages/rasterio/proj_data
 GDAL DATA: /home/docs/checkouts/readthedocs.org/user_builds/zen3geo/envs/v0.4.0/lib/python3.10/site-packages/rasterio/gdal_data

Other python deps:
     scipy: 1.9.1
    pyproj: 3.3.1

System:
    python: 3.10.4 (main, Jun  1 2022, 20:56:54) [GCC 11.2.0]
executable: /home/docs/checkouts/readthedocs.org/user_builds/zen3geo/envs/v0.4.0/bin/python
   machine: Linux-5.15.0-1004-aws-x86_64-with-glibc2.35
0️⃣ Find Cloud-Optimized GeoTIFFs 🗺️#
Let’s get some optical satellite data using STAC! How about Sentinel-2 L2A data over Singapore 🇸🇬?
🔗 Links:
item_url = "https://planetarycomputer.microsoft.com/api/stac/v1/collections/sentinel-2-l2a/items/S2A_MSIL2A_20220115T032101_R118_T48NUG_20220115T170435"

# Load the individual item metadata and sign the assets
item = pystac.Item.from_file(item_url)
signed_item = planetary_computer.sign(item)
signed_item
Item: S2A_MSIL2A_20220115T032101_R118_T48NUG_20220115T170435
| ID: S2A_MSIL2A_20220115T032101_R118_T48NUG_20220115T170435 |
| Bounding Box: [103.20205689, 0.81602476, 104.18934086, 1.8096362] |
| Datetime: 2022-01-15 03:21:01.024000+00:00 |
| datetime: 2022-01-15T03:21:01.024000Z |
| platform: Sentinel-2A |
| proj:epsg: 32648 |
| instruments: ['msi'] |
| s2:mgrs_tile: 48NUG |
| constellation: Sentinel 2 |
| s2:granule_id: S2A_OPER_MSI_L2A_TL_ESRI_20220115T170436_A034292_T48NUG_N03.00 |
| eo:cloud_cover: 17.352597 |
| s2:datatake_id: GS2A_20220115T032101_034292_N03.00 |
| s2:product_uri: S2A_MSIL2A_20220115T032101_N0300_R118_T48NUG_20220115T170435.SAFE |
| s2:datastrip_id: S2A_OPER_MSI_L2A_DS_ESRI_20220115T170436_S20220115T033502_N03.00 |
| s2:product_type: S2MSI2A |
| sat:orbit_state: descending |
| s2:datatake_type: INS-NOBS |
| s2:generation_time: 2022-01-15T17:04:35.333066Z |
| sat:relative_orbit: 118 |
| s2:water_percentage: 37.552899 |
| s2:mean_solar_zenith: 32.5977245182785 |
| s2:mean_solar_azimuth: 134.8610857439 |
| s2:processing_baseline: 03.00 |
| s2:snow_ice_percentage: 0.000617 |
| s2:vegetation_percentage: 30.781212 |
| s2:thin_cirrus_percentage: 10.297693 |
| s2:cloud_shadow_percentage: 1.10995 |
| s2:nodata_pixel_percentage: 3e-06 |
| s2:unclassified_percentage: 2.320639 |
| s2:dark_features_percentage: 0.780946 |
| s2:not_vegetated_percentage: 10.101138 |
| s2:degraded_msi_data_percentage: 0.0 |
| s2:high_proba_clouds_percentage: 3.881726 |
| s2:reflectance_conversion_factor: 1.0339916908969 |
| s2:medium_proba_clouds_percentage: 3.173178 |
| s2:saturated_defective_pixel_percentage: 0.0 |
STAC Extensions
| https://stac-extensions.github.io/eo/v1.0.0/schema.json |
| https://stac-extensions.github.io/sat/v1.0.0/schema.json |
| https://stac-extensions.github.io/projection/v1.0.0/schema.json |
Assets
Asset: Aerosol optical thickness (AOT)
| href: https://sentinel2l2a01.blob.core.windows.net/sentinel2-l2/48/N/UG/2022/01/15/S2A_MSIL2A_20220115T032101_N0300_R118_T48NUG_20220115T170435.SAFE/GRANULE/L2A_T48NUG_A034292_20220115T033502/IMG_DATA/R10m/T48NUG_20220115T032101_AOT_10m.tif?st=2022-09-07T21%3A11%3A31Z&se=2022-09-08T21%3A56%3A31Z&sp=rl&sv=2021-06-08&sr=c&skoid=c85c15d6-d1ae-42d4-af60-e2ca0f81359b&sktid=72f988bf-86f1-41af-91ab-2d7cd011db47&skt=2022-09-08T20%3A33%3A00Z&ske=2022-09-15T20%3A33%3A00Z&sks=b&skv=2021-06-08&sig=i0H7yYEXTULp9XfknY7ZFDHxPIsOdpIM1nGqqjYJYGM%3D |
| Title: Aerosol optical thickness (AOT) |
| Media type: image/tiff; application=geotiff; profile=cloud-optimized |
| Roles: ['data'] |
| Owner: |
| proj:bbox: [300000.0, 90240.0, 409800.0, 200040.0] |
| proj:shape: [10980, 10980] |
| proj:transform: [10.0, 0.0, 300000.0, 0.0, -10.0, 200040.0] |
| gsd: 10.0 |
Asset: Band 1 - Coastal aerosol - 60m
| href: https://sentinel2l2a01.blob.core.windows.net/sentinel2-l2/48/N/UG/2022/01/15/S2A_MSIL2A_20220115T032101_N0300_R118_T48NUG_20220115T170435.SAFE/GRANULE/L2A_T48NUG_A034292_20220115T033502/IMG_DATA/R60m/T48NUG_20220115T032101_B01_60m.tif?st=2022-09-07T21%3A11%3A31Z&se=2022-09-08T21%3A56%3A31Z&sp=rl&sv=2021-06-08&sr=c&skoid=c85c15d6-d1ae-42d4-af60-e2ca0f81359b&sktid=72f988bf-86f1-41af-91ab-2d7cd011db47&skt=2022-09-08T20%3A33%3A00Z&ske=2022-09-15T20%3A33%3A00Z&sks=b&skv=2021-06-08&sig=i0H7yYEXTULp9XfknY7ZFDHxPIsOdpIM1nGqqjYJYGM%3D |
| Title: Band 1 - Coastal aerosol - 60m |
| Media type: image/tiff; application=geotiff; profile=cloud-optimized |
| Roles: ['data'] |
| Owner: |
| proj:bbox: [300000.0, 90240.0, 409800.0, 200040.0] |
| proj:shape: [1830, 1830] |
| proj:transform: [60.0, 0.0, 300000.0, 0.0, -60.0, 200040.0] |
| gsd: 60.0 |
| eo:bands: [{'name': 'B01', 'common_name': 'coastal', 'description': 'Band 1 - Coastal aerosol', 'center_wavelength': 0.443, 'full_width_half_max': 0.027}] |
Asset: Band 2 - Blue - 10m
| href: https://sentinel2l2a01.blob.core.windows.net/sentinel2-l2/48/N/UG/2022/01/15/S2A_MSIL2A_20220115T032101_N0300_R118_T48NUG_20220115T170435.SAFE/GRANULE/L2A_T48NUG_A034292_20220115T033502/IMG_DATA/R10m/T48NUG_20220115T032101_B02_10m.tif?st=2022-09-07T21%3A11%3A31Z&se=2022-09-08T21%3A56%3A31Z&sp=rl&sv=2021-06-08&sr=c&skoid=c85c15d6-d1ae-42d4-af60-e2ca0f81359b&sktid=72f988bf-86f1-41af-91ab-2d7cd011db47&skt=2022-09-08T20%3A33%3A00Z&ske=2022-09-15T20%3A33%3A00Z&sks=b&skv=2021-06-08&sig=i0H7yYEXTULp9XfknY7ZFDHxPIsOdpIM1nGqqjYJYGM%3D |
| Title: Band 2 - Blue - 10m |
| Media type: image/tiff; application=geotiff; profile=cloud-optimized |
| Roles: ['data'] |
| Owner: |
| proj:bbox: [300000.0, 90240.0, 409800.0, 200040.0] |
| proj:shape: [10980, 10980] |
| proj:transform: [10.0, 0.0, 300000.0, 0.0, -10.0, 200040.0] |
| gsd: 10.0 |
| eo:bands: [{'name': 'B02', 'common_name': 'blue', 'description': 'Band 2 - Blue', 'center_wavelength': 0.49, 'full_width_half_max': 0.098}] |
Asset: Band 3 - Green - 10m
| href: https://sentinel2l2a01.blob.core.windows.net/sentinel2-l2/48/N/UG/2022/01/15/S2A_MSIL2A_20220115T032101_N0300_R118_T48NUG_20220115T170435.SAFE/GRANULE/L2A_T48NUG_A034292_20220115T033502/IMG_DATA/R10m/T48NUG_20220115T032101_B03_10m.tif?st=2022-09-07T21%3A11%3A31Z&se=2022-09-08T21%3A56%3A31Z&sp=rl&sv=2021-06-08&sr=c&skoid=c85c15d6-d1ae-42d4-af60-e2ca0f81359b&sktid=72f988bf-86f1-41af-91ab-2d7cd011db47&skt=2022-09-08T20%3A33%3A00Z&ske=2022-09-15T20%3A33%3A00Z&sks=b&skv=2021-06-08&sig=i0H7yYEXTULp9XfknY7ZFDHxPIsOdpIM1nGqqjYJYGM%3D |
| Title: Band 3 - Green - 10m |
| Media type: image/tiff; application=geotiff; profile=cloud-optimized |
| Roles: ['data'] |
| Owner: |
| proj:bbox: [300000.0, 90240.0, 409800.0, 200040.0] |
| proj:shape: [10980, 10980] |
| proj:transform: [10.0, 0.0, 300000.0, 0.0, -10.0, 200040.0] |
| gsd: 10.0 |
| eo:bands: [{'name': 'B03', 'common_name': 'green', 'description': 'Band 3 - Green', 'center_wavelength': 0.56, 'full_width_half_max': 0.045}] |
Asset: Band 4 - Red - 10m
| href: https://sentinel2l2a01.blob.core.windows.net/sentinel2-l2/48/N/UG/2022/01/15/S2A_MSIL2A_20220115T032101_N0300_R118_T48NUG_20220115T170435.SAFE/GRANULE/L2A_T48NUG_A034292_20220115T033502/IMG_DATA/R10m/T48NUG_20220115T032101_B04_10m.tif?st=2022-09-07T21%3A11%3A31Z&se=2022-09-08T21%3A56%3A31Z&sp=rl&sv=2021-06-08&sr=c&skoid=c85c15d6-d1ae-42d4-af60-e2ca0f81359b&sktid=72f988bf-86f1-41af-91ab-2d7cd011db47&skt=2022-09-08T20%3A33%3A00Z&ske=2022-09-15T20%3A33%3A00Z&sks=b&skv=2021-06-08&sig=i0H7yYEXTULp9XfknY7ZFDHxPIsOdpIM1nGqqjYJYGM%3D |
| Title: Band 4 - Red - 10m |
| Media type: image/tiff; application=geotiff; profile=cloud-optimized |
| Roles: ['data'] |
| Owner: |
| proj:bbox: [300000.0, 90240.0, 409800.0, 200040.0] |
| proj:shape: [10980, 10980] |
| proj:transform: [10.0, 0.0, 300000.0, 0.0, -10.0, 200040.0] |
| gsd: 10.0 |
| eo:bands: [{'name': 'B04', 'common_name': 'red', 'description': 'Band 4 - Red', 'center_wavelength': 0.665, 'full_width_half_max': 0.038}] |
Asset: Band 5 - Vegetation red edge 1 - 20m
| href: https://sentinel2l2a01.blob.core.windows.net/sentinel2-l2/48/N/UG/2022/01/15/S2A_MSIL2A_20220115T032101_N0300_R118_T48NUG_20220115T170435.SAFE/GRANULE/L2A_T48NUG_A034292_20220115T033502/IMG_DATA/R20m/T48NUG_20220115T032101_B05_20m.tif?st=2022-09-07T21%3A11%3A31Z&se=2022-09-08T21%3A56%3A31Z&sp=rl&sv=2021-06-08&sr=c&skoid=c85c15d6-d1ae-42d4-af60-e2ca0f81359b&sktid=72f988bf-86f1-41af-91ab-2d7cd011db47&skt=2022-09-08T20%3A33%3A00Z&ske=2022-09-15T20%3A33%3A00Z&sks=b&skv=2021-06-08&sig=i0H7yYEXTULp9XfknY7ZFDHxPIsOdpIM1nGqqjYJYGM%3D |
| Title: Band 5 - Vegetation red edge 1 - 20m |
| Media type: image/tiff; application=geotiff; profile=cloud-optimized |
| Roles: ['data'] |
| Owner: |
| proj:bbox: [300000.0, 90240.0, 409800.0, 200040.0] |
| proj:shape: [5490, 5490] |
| proj:transform: [20.0, 0.0, 300000.0, 0.0, -20.0, 200040.0] |
| gsd: 20.0 |
| eo:bands: [{'name': 'B05', 'common_name': 'rededge', 'description': 'Band 5 - Vegetation red edge 1', 'center_wavelength': 0.704, 'full_width_half_max': 0.019}] |
Asset: Band 6 - Vegetation red edge 2 - 20m
| href: https://sentinel2l2a01.blob.core.windows.net/sentinel2-l2/48/N/UG/2022/01/15/S2A_MSIL2A_20220115T032101_N0300_R118_T48NUG_20220115T170435.SAFE/GRANULE/L2A_T48NUG_A034292_20220115T033502/IMG_DATA/R20m/T48NUG_20220115T032101_B06_20m.tif?st=2022-09-07T21%3A11%3A31Z&se=2022-09-08T21%3A56%3A31Z&sp=rl&sv=2021-06-08&sr=c&skoid=c85c15d6-d1ae-42d4-af60-e2ca0f81359b&sktid=72f988bf-86f1-41af-91ab-2d7cd011db47&skt=2022-09-08T20%3A33%3A00Z&ske=2022-09-15T20%3A33%3A00Z&sks=b&skv=2021-06-08&sig=i0H7yYEXTULp9XfknY7ZFDHxPIsOdpIM1nGqqjYJYGM%3D |
| Title: Band 6 - Vegetation red edge 2 - 20m |
| Media type: image/tiff; application=geotiff; profile=cloud-optimized |
| Roles: ['data'] |
| Owner: |
| proj:bbox: [300000.0, 90240.0, 409800.0, 200040.0] |
| proj:shape: [5490, 5490] |
| proj:transform: [20.0, 0.0, 300000.0, 0.0, -20.0, 200040.0] |
| gsd: 20.0 |
| eo:bands: [{'name': 'B06', 'common_name': 'rededge', 'description': 'Band 6 - Vegetation red edge 2', 'center_wavelength': 0.74, 'full_width_half_max': 0.018}] |
Asset: Band 7 - Vegetation red edge 3 - 20m
| href: https://sentinel2l2a01.blob.core.windows.net/sentinel2-l2/48/N/UG/2022/01/15/S2A_MSIL2A_20220115T032101_N0300_R118_T48NUG_20220115T170435.SAFE/GRANULE/L2A_T48NUG_A034292_20220115T033502/IMG_DATA/R20m/T48NUG_20220115T032101_B07_20m.tif?st=2022-09-07T21%3A11%3A31Z&se=2022-09-08T21%3A56%3A31Z&sp=rl&sv=2021-06-08&sr=c&skoid=c85c15d6-d1ae-42d4-af60-e2ca0f81359b&sktid=72f988bf-86f1-41af-91ab-2d7cd011db47&skt=2022-09-08T20%3A33%3A00Z&ske=2022-09-15T20%3A33%3A00Z&sks=b&skv=2021-06-08&sig=i0H7yYEXTULp9XfknY7ZFDHxPIsOdpIM1nGqqjYJYGM%3D |
| Title: Band 7 - Vegetation red edge 3 - 20m |
| Media type: image/tiff; application=geotiff; profile=cloud-optimized |
| Roles: ['data'] |
| Owner: |
| proj:bbox: [300000.0, 90240.0, 409800.0, 200040.0] |
| proj:shape: [5490, 5490] |
| proj:transform: [20.0, 0.0, 300000.0, 0.0, -20.0, 200040.0] |
| gsd: 20.0 |
| eo:bands: [{'name': 'B07', 'common_name': 'rededge', 'description': 'Band 7 - Vegetation red edge 3', 'center_wavelength': 0.783, 'full_width_half_max': 0.028}] |
Asset: Band 8 - NIR - 10m
| href: https://sentinel2l2a01.blob.core.windows.net/sentinel2-l2/48/N/UG/2022/01/15/S2A_MSIL2A_20220115T032101_N0300_R118_T48NUG_20220115T170435.SAFE/GRANULE/L2A_T48NUG_A034292_20220115T033502/IMG_DATA/R10m/T48NUG_20220115T032101_B08_10m.tif?st=2022-09-07T21%3A11%3A31Z&se=2022-09-08T21%3A56%3A31Z&sp=rl&sv=2021-06-08&sr=c&skoid=c85c15d6-d1ae-42d4-af60-e2ca0f81359b&sktid=72f988bf-86f1-41af-91ab-2d7cd011db47&skt=2022-09-08T20%3A33%3A00Z&ske=2022-09-15T20%3A33%3A00Z&sks=b&skv=2021-06-08&sig=i0H7yYEXTULp9XfknY7ZFDHxPIsOdpIM1nGqqjYJYGM%3D |
| Title: Band 8 - NIR - 10m |
| Media type: image/tiff; application=geotiff; profile=cloud-optimized |
| Roles: ['data'] |
| Owner: |
| proj:bbox: [300000.0, 90240.0, 409800.0, 200040.0] |
| proj:shape: [10980, 10980] |
| proj:transform: [10.0, 0.0, 300000.0, 0.0, -10.0, 200040.0] |
| gsd: 10.0 |
| eo:bands: [{'name': 'B08', 'common_name': 'nir', 'description': 'Band 8 - NIR', 'center_wavelength': 0.842, 'full_width_half_max': 0.145}] |
Asset: Band 9 - Water vapor - 60m
| href: https://sentinel2l2a01.blob.core.windows.net/sentinel2-l2/48/N/UG/2022/01/15/S2A_MSIL2A_20220115T032101_N0300_R118_T48NUG_20220115T170435.SAFE/GRANULE/L2A_T48NUG_A034292_20220115T033502/IMG_DATA/R60m/T48NUG_20220115T032101_B09_60m.tif?st=2022-09-07T21%3A11%3A31Z&se=2022-09-08T21%3A56%3A31Z&sp=rl&sv=2021-06-08&sr=c&skoid=c85c15d6-d1ae-42d4-af60-e2ca0f81359b&sktid=72f988bf-86f1-41af-91ab-2d7cd011db47&skt=2022-09-08T20%3A33%3A00Z&ske=2022-09-15T20%3A33%3A00Z&sks=b&skv=2021-06-08&sig=i0H7yYEXTULp9XfknY7ZFDHxPIsOdpIM1nGqqjYJYGM%3D |
| Title: Band 9 - Water vapor - 60m |
| Media type: image/tiff; application=geotiff; profile=cloud-optimized |
| Roles: ['data'] |
| Owner: |
| proj:bbox: [300000.0, 90240.0, 409800.0, 200040.0] |
| proj:shape: [1830, 1830] |
| proj:transform: [60.0, 0.0, 300000.0, 0.0, -60.0, 200040.0] |
| gsd: 60.0 |
| eo:bands: [{'name': 'B09', 'description': 'Band 9 - Water vapor', 'center_wavelength': 0.945, 'full_width_half_max': 0.026}] |
Asset: Band 11 - SWIR (1.6) - 20m
| href: https://sentinel2l2a01.blob.core.windows.net/sentinel2-l2/48/N/UG/2022/01/15/S2A_MSIL2A_20220115T032101_N0300_R118_T48NUG_20220115T170435.SAFE/GRANULE/L2A_T48NUG_A034292_20220115T033502/IMG_DATA/R20m/T48NUG_20220115T032101_B11_20m.tif?st=2022-09-07T21%3A11%3A31Z&se=2022-09-08T21%3A56%3A31Z&sp=rl&sv=2021-06-08&sr=c&skoid=c85c15d6-d1ae-42d4-af60-e2ca0f81359b&sktid=72f988bf-86f1-41af-91ab-2d7cd011db47&skt=2022-09-08T20%3A33%3A00Z&ske=2022-09-15T20%3A33%3A00Z&sks=b&skv=2021-06-08&sig=i0H7yYEXTULp9XfknY7ZFDHxPIsOdpIM1nGqqjYJYGM%3D |
| Title: Band 11 - SWIR (1.6) - 20m |
| Media type: image/tiff; application=geotiff; profile=cloud-optimized |
| Roles: ['data'] |
| Owner: |
| proj:bbox: [300000.0, 90240.0, 409800.0, 200040.0] |
| proj:shape: [5490, 5490] |
| proj:transform: [20.0, 0.0, 300000.0, 0.0, -20.0, 200040.0] |
| gsd: 20.0 |
| eo:bands: [{'name': 'B11', 'common_name': 'swir16', 'description': 'Band 11 - SWIR (1.6)', 'center_wavelength': 1.61, 'full_width_half_max': 0.143}] |
Asset: Band 12 - SWIR (2.2) - 20m
| href: https://sentinel2l2a01.blob.core.windows.net/sentinel2-l2/48/N/UG/2022/01/15/S2A_MSIL2A_20220115T032101_N0300_R118_T48NUG_20220115T170435.SAFE/GRANULE/L2A_T48NUG_A034292_20220115T033502/IMG_DATA/R20m/T48NUG_20220115T032101_B12_20m.tif?st=2022-09-07T21%3A11%3A31Z&se=2022-09-08T21%3A56%3A31Z&sp=rl&sv=2021-06-08&sr=c&skoid=c85c15d6-d1ae-42d4-af60-e2ca0f81359b&sktid=72f988bf-86f1-41af-91ab-2d7cd011db47&skt=2022-09-08T20%3A33%3A00Z&ske=2022-09-15T20%3A33%3A00Z&sks=b&skv=2021-06-08&sig=i0H7yYEXTULp9XfknY7ZFDHxPIsOdpIM1nGqqjYJYGM%3D |
| Title: Band 12 - SWIR (2.2) - 20m |
| Media type: image/tiff; application=geotiff; profile=cloud-optimized |
| Roles: ['data'] |
| Owner: |
| proj:bbox: [300000.0, 90240.0, 409800.0, 200040.0] |
| proj:shape: [5490, 5490] |
| proj:transform: [20.0, 0.0, 300000.0, 0.0, -20.0, 200040.0] |
| gsd: 20.0 |
| eo:bands: [{'name': 'B12', 'common_name': 'swir22', 'description': 'Band 12 - SWIR (2.2)', 'center_wavelength': 2.19, 'full_width_half_max': 0.242}] |
Asset: Band 8A - Vegetation red edge 4 - 20m
| href: https://sentinel2l2a01.blob.core.windows.net/sentinel2-l2/48/N/UG/2022/01/15/S2A_MSIL2A_20220115T032101_N0300_R118_T48NUG_20220115T170435.SAFE/GRANULE/L2A_T48NUG_A034292_20220115T033502/IMG_DATA/R20m/T48NUG_20220115T032101_B8A_20m.tif?st=2022-09-07T21%3A11%3A31Z&se=2022-09-08T21%3A56%3A31Z&sp=rl&sv=2021-06-08&sr=c&skoid=c85c15d6-d1ae-42d4-af60-e2ca0f81359b&sktid=72f988bf-86f1-41af-91ab-2d7cd011db47&skt=2022-09-08T20%3A33%3A00Z&ske=2022-09-15T20%3A33%3A00Z&sks=b&skv=2021-06-08&sig=i0H7yYEXTULp9XfknY7ZFDHxPIsOdpIM1nGqqjYJYGM%3D |
| Title: Band 8A - Vegetation red edge 4 - 20m |
| Media type: image/tiff; application=geotiff; profile=cloud-optimized |
| Roles: ['data'] |
| Owner: |
| proj:bbox: [300000.0, 90240.0, 409800.0, 200040.0] |
| proj:shape: [5490, 5490] |
| proj:transform: [20.0, 0.0, 300000.0, 0.0, -20.0, 200040.0] |
| gsd: 20.0 |
| eo:bands: [{'name': 'B8A', 'common_name': 'rededge', 'description': 'Band 8A - Vegetation red edge 4', 'center_wavelength': 0.865, 'full_width_half_max': 0.033}] |
Asset: Scene classfication map (SCL)
| href: https://sentinel2l2a01.blob.core.windows.net/sentinel2-l2/48/N/UG/2022/01/15/S2A_MSIL2A_20220115T032101_N0300_R118_T48NUG_20220115T170435.SAFE/GRANULE/L2A_T48NUG_A034292_20220115T033502/IMG_DATA/R20m/T48NUG_20220115T032101_SCL_20m.tif?st=2022-09-07T21%3A11%3A31Z&se=2022-09-08T21%3A56%3A31Z&sp=rl&sv=2021-06-08&sr=c&skoid=c85c15d6-d1ae-42d4-af60-e2ca0f81359b&sktid=72f988bf-86f1-41af-91ab-2d7cd011db47&skt=2022-09-08T20%3A33%3A00Z&ske=2022-09-15T20%3A33%3A00Z&sks=b&skv=2021-06-08&sig=i0H7yYEXTULp9XfknY7ZFDHxPIsOdpIM1nGqqjYJYGM%3D |
| Title: Scene classfication map (SCL) |
| Media type: image/tiff; application=geotiff; profile=cloud-optimized |
| Roles: ['data'] |
| Owner: |
| proj:bbox: [300000.0, 90240.0, 409800.0, 200040.0] |
| proj:shape: [5490, 5490] |
| proj:transform: [20.0, 0.0, 300000.0, 0.0, -20.0, 200040.0] |
| gsd: 20.0 |
Asset: Water vapour (WVP)
| href: https://sentinel2l2a01.blob.core.windows.net/sentinel2-l2/48/N/UG/2022/01/15/S2A_MSIL2A_20220115T032101_N0300_R118_T48NUG_20220115T170435.SAFE/GRANULE/L2A_T48NUG_A034292_20220115T033502/IMG_DATA/R10m/T48NUG_20220115T032101_WVP_10m.tif?st=2022-09-07T21%3A11%3A31Z&se=2022-09-08T21%3A56%3A31Z&sp=rl&sv=2021-06-08&sr=c&skoid=c85c15d6-d1ae-42d4-af60-e2ca0f81359b&sktid=72f988bf-86f1-41af-91ab-2d7cd011db47&skt=2022-09-08T20%3A33%3A00Z&ske=2022-09-15T20%3A33%3A00Z&sks=b&skv=2021-06-08&sig=i0H7yYEXTULp9XfknY7ZFDHxPIsOdpIM1nGqqjYJYGM%3D |
| Title: Water vapour (WVP) |
| Media type: image/tiff; application=geotiff; profile=cloud-optimized |
| Roles: ['data'] |
| Owner: |
| proj:bbox: [300000.0, 90240.0, 409800.0, 200040.0] |
| proj:shape: [10980, 10980] |
| proj:transform: [10.0, 0.0, 300000.0, 0.0, -10.0, 200040.0] |
| gsd: 10.0 |
Asset: True color image
| href: https://sentinel2l2a01.blob.core.windows.net/sentinel2-l2/48/N/UG/2022/01/15/S2A_MSIL2A_20220115T032101_N0300_R118_T48NUG_20220115T170435.SAFE/GRANULE/L2A_T48NUG_A034292_20220115T033502/IMG_DATA/R10m/T48NUG_20220115T032101_TCI_10m.tif?st=2022-09-07T21%3A11%3A31Z&se=2022-09-08T21%3A56%3A31Z&sp=rl&sv=2021-06-08&sr=c&skoid=c85c15d6-d1ae-42d4-af60-e2ca0f81359b&sktid=72f988bf-86f1-41af-91ab-2d7cd011db47&skt=2022-09-08T20%3A33%3A00Z&ske=2022-09-15T20%3A33%3A00Z&sks=b&skv=2021-06-08&sig=i0H7yYEXTULp9XfknY7ZFDHxPIsOdpIM1nGqqjYJYGM%3D |
| Title: True color image |
| Media type: image/tiff; application=geotiff; profile=cloud-optimized |
| Roles: ['data'] |
| Owner: |
| proj:bbox: [300000.0, 90240.0, 409800.0, 200040.0] |
| proj:shape: [10980, 10980] |
| proj:transform: [10.0, 0.0, 300000.0, 0.0, -10.0, 200040.0] |
| gsd: 10.0 |
| eo:bands: [{'name': 'B04', 'common_name': 'red', 'description': 'Band 4 - Red', 'center_wavelength': 0.665, 'full_width_half_max': 0.038}, {'name': 'B03', 'common_name': 'green', 'description': 'Band 3 - Green', 'center_wavelength': 0.56, 'full_width_half_max': 0.045}, {'name': 'B02', 'common_name': 'blue', 'description': 'Band 2 - Blue', 'center_wavelength': 0.49, 'full_width_half_max': 0.098}] |
Asset: Thumbnail
| href: https://sentinel2l2a01.blob.core.windows.net/sentinel2-l2/48/N/UG/2022/01/15/S2A_MSIL2A_20220115T032101_N0300_R118_T48NUG_20220115T170435.SAFE/GRANULE/L2A_T48NUG_A034292_20220115T033502/QI_DATA/T48NUG_20220115T032101_PVI.tif?st=2022-09-07T21%3A11%3A31Z&se=2022-09-08T21%3A56%3A31Z&sp=rl&sv=2021-06-08&sr=c&skoid=c85c15d6-d1ae-42d4-af60-e2ca0f81359b&sktid=72f988bf-86f1-41af-91ab-2d7cd011db47&skt=2022-09-08T20%3A33%3A00Z&ske=2022-09-15T20%3A33%3A00Z&sks=b&skv=2021-06-08&sig=i0H7yYEXTULp9XfknY7ZFDHxPIsOdpIM1nGqqjYJYGM%3D |
| Title: Thumbnail |
| Media type: image/tiff; application=geotiff; profile=cloud-optimized |
| Roles: ['thumbnail'] |
| Owner: |
Asset: SAFE manifest
| href: https://sentinel2l2a01.blob.core.windows.net/sentinel2-l2/48/N/UG/2022/01/15/S2A_MSIL2A_20220115T032101_N0300_R118_T48NUG_20220115T170435.SAFE/manifest.safe?st=2022-09-07T21%3A11%3A31Z&se=2022-09-08T21%3A56%3A31Z&sp=rl&sv=2021-06-08&sr=c&skoid=c85c15d6-d1ae-42d4-af60-e2ca0f81359b&sktid=72f988bf-86f1-41af-91ab-2d7cd011db47&skt=2022-09-08T20%3A33%3A00Z&ske=2022-09-15T20%3A33%3A00Z&sks=b&skv=2021-06-08&sig=i0H7yYEXTULp9XfknY7ZFDHxPIsOdpIM1nGqqjYJYGM%3D |
| Title: SAFE manifest |
| Media type: application/xml |
| Roles: ['metadata'] |
| Owner: |
Asset: Granule metadata
| href: https://sentinel2l2a01.blob.core.windows.net/sentinel2-l2/48/N/UG/2022/01/15/S2A_MSIL2A_20220115T032101_N0300_R118_T48NUG_20220115T170435.SAFE/GRANULE/L2A_T48NUG_A034292_20220115T033502/MTD_TL.xml?st=2022-09-07T21%3A11%3A31Z&se=2022-09-08T21%3A56%3A31Z&sp=rl&sv=2021-06-08&sr=c&skoid=c85c15d6-d1ae-42d4-af60-e2ca0f81359b&sktid=72f988bf-86f1-41af-91ab-2d7cd011db47&skt=2022-09-08T20%3A33%3A00Z&ske=2022-09-15T20%3A33%3A00Z&sks=b&skv=2021-06-08&sig=i0H7yYEXTULp9XfknY7ZFDHxPIsOdpIM1nGqqjYJYGM%3D |
| Title: Granule metadata |
| Media type: application/xml |
| Roles: ['metadata'] |
| Owner: |
Asset: INSPIRE metadata
| href: https://sentinel2l2a01.blob.core.windows.net/sentinel2-l2/48/N/UG/2022/01/15/S2A_MSIL2A_20220115T032101_N0300_R118_T48NUG_20220115T170435.SAFE/INSPIRE.xml?st=2022-09-07T21%3A11%3A31Z&se=2022-09-08T21%3A56%3A31Z&sp=rl&sv=2021-06-08&sr=c&skoid=c85c15d6-d1ae-42d4-af60-e2ca0f81359b&sktid=72f988bf-86f1-41af-91ab-2d7cd011db47&skt=2022-09-08T20%3A33%3A00Z&ske=2022-09-15T20%3A33%3A00Z&sks=b&skv=2021-06-08&sig=i0H7yYEXTULp9XfknY7ZFDHxPIsOdpIM1nGqqjYJYGM%3D |
| Title: INSPIRE metadata |
| Media type: application/xml |
| Roles: ['metadata'] |
| Owner: |
Asset: Product metadata
| href: https://sentinel2l2a01.blob.core.windows.net/sentinel2-l2/48/N/UG/2022/01/15/S2A_MSIL2A_20220115T032101_N0300_R118_T48NUG_20220115T170435.SAFE/MTD_MSIL2A.xml?st=2022-09-07T21%3A11%3A31Z&se=2022-09-08T21%3A56%3A31Z&sp=rl&sv=2021-06-08&sr=c&skoid=c85c15d6-d1ae-42d4-af60-e2ca0f81359b&sktid=72f988bf-86f1-41af-91ab-2d7cd011db47&skt=2022-09-08T20%3A33%3A00Z&ske=2022-09-15T20%3A33%3A00Z&sks=b&skv=2021-06-08&sig=i0H7yYEXTULp9XfknY7ZFDHxPIsOdpIM1nGqqjYJYGM%3D |
| Title: Product metadata |
| Media type: application/xml |
| Roles: ['metadata'] |
| Owner: |
Asset: Datastrip metadata
| href: https://sentinel2l2a01.blob.core.windows.net/sentinel2-l2/48/N/UG/2022/01/15/S2A_MSIL2A_20220115T032101_N0300_R118_T48NUG_20220115T170435.SAFE/DATASTRIP/DS_ESRI_20220115T170436_S20220115T033502/MTD_DS.xml?st=2022-09-07T21%3A11%3A31Z&se=2022-09-08T21%3A56%3A31Z&sp=rl&sv=2021-06-08&sr=c&skoid=c85c15d6-d1ae-42d4-af60-e2ca0f81359b&sktid=72f988bf-86f1-41af-91ab-2d7cd011db47&skt=2022-09-08T20%3A33%3A00Z&ske=2022-09-15T20%3A33%3A00Z&sks=b&skv=2021-06-08&sig=i0H7yYEXTULp9XfknY7ZFDHxPIsOdpIM1nGqqjYJYGM%3D |
| Title: Datastrip metadata |
| Media type: application/xml |
| Roles: ['metadata'] |
| Owner: |
Asset: TileJSON with default rendering
| href: https://planetarycomputer.microsoft.com/api/data/v1/item/tilejson.json?collection=sentinel-2-l2a&item=S2A_MSIL2A_20220115T032101_R118_T48NUG_20220115T170435&assets=visual&asset_bidx=visual%7C1%2C2%2C3&nodata=0 |
| Title: TileJSON with default rendering |
| Media type: application/json |
| Roles: ['tiles'] |
| Owner: |
Asset: Rendered preview
| href: https://planetarycomputer.microsoft.com/api/data/v1/item/preview.png?collection=sentinel-2-l2a&item=S2A_MSIL2A_20220115T032101_R118_T48NUG_20220115T170435&assets=visual&asset_bidx=visual%7C1%2C2%2C3&nodata=0 |
| Title: Rendered preview |
| Media type: image/png |
| Roles: ['overview'] |
| Owner: |
| rel: preview |
Links
Link:
| Rel: collection |
| Target: https://planetarycomputer.microsoft.com/api/stac/v1/collections/sentinel-2-l2a |
| Media Type: application/json |
Link:
| Rel: parent |
| Target: https://planetarycomputer.microsoft.com/api/stac/v1/collections/sentinel-2-l2a |
| Media Type: application/json |
Link:
| Rel: root |
| Target: https://planetarycomputer.microsoft.com/api/stac/v1/ |
| Media Type: application/json |
Link:
| Rel: self |
| Target: https://planetarycomputer.microsoft.com/api/stac/v1/collections/sentinel-2-l2a/items/S2A_MSIL2A_20220115T032101_R118_T48NUG_20220115T170435 |
| Media Type: application/geo+json |
Link:
| Rel: license |
| Target: https://sentinel.esa.int/documents/247904/690755/Sentinel_Data_Legal_Notice |
Link:
Map of item
| Rel: preview |
| Target: https://planetarycomputer.microsoft.com/api/data/v1/item/map?collection=sentinel-2-l2a&item=S2A_MSIL2A_20220115T032101_R118_T48NUG_20220115T170435 |
| Media Type: text/html |
Inspect one of the data assets 🍱#
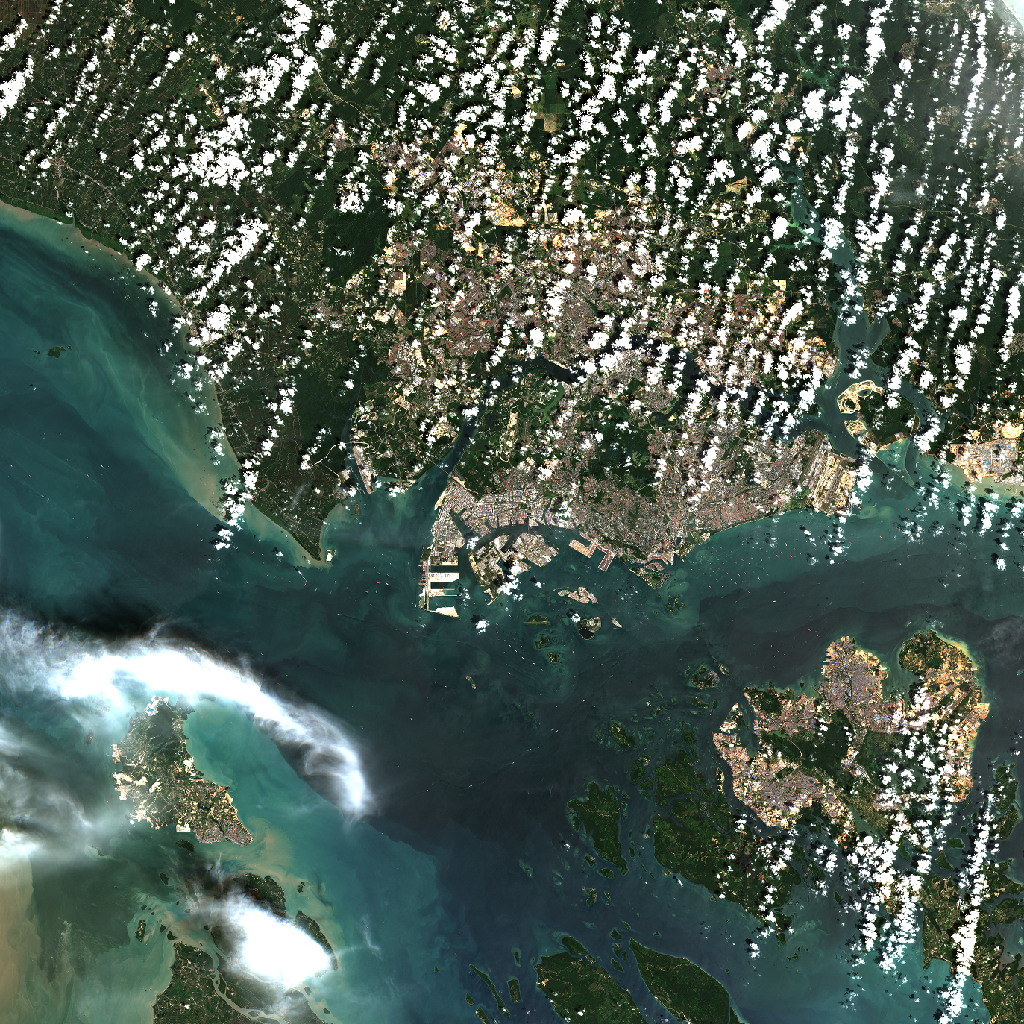
The Sentinel-2 STAC item contains several assets. These include different 🌈 bands (e.g. ‘B02’, ‘B03’, ‘B04’). Let’s just use the ‘visual’ product for now which includes the RGB bands.
url: str = signed_item.assets["visual"].href
da = rioxarray.open_rasterio(filename=url)
da
<xarray.DataArray (band: 3, y: 10980, x: 10980)>
[361681200 values with dtype=uint8]
Coordinates:
  * band         (band) int64 1 2 3
  * x            (x) float64 3e+05 3e+05 3e+05 ... 4.098e+05 4.098e+05 4.098e+05
  * y            (y) float64 2e+05 2e+05 2e+05 ... 9.026e+04 9.026e+04 9.024e+04
    spatial_ref  int64 0
Attributes:
    _FillValue:    0.0
    scale_factor:  1.0
add_offset: 0.0This is how the Sentinel-2 image looks like over Singapore on 15 Jan 2022.
1️⃣ Construct DataPipe 📡#
A torch DataPipe is a way of composing data (rather than inheriting data).
Yes, I don’t know what it really means either, so here’s some extra reading.
🔖 References:
https://pytorch.org/blog/pytorch-1.11-released/#introducing-torchdata
https://github.com/pytorch/data/tree/v0.4.0#what-are-datapipes
Create an Iterable 📏#
Start by wrapping a list of URLs to the Cloud-Optimized GeoTIFF files.
We only have 1 item so we’ll use [url], but if you have more, you can do
[url1, url2, url3], etc. Pass this iterable list into
torchdata.datapipes.iter.IterableWrapper:
dp = torchdata.datapipes.iter.IterableWrapper(iterable=[url])
dp
IterableWrapperIterDataPipe
The dp variable is the DataPipe!
Now to apply some more transformations/functions on it.
Read using RioXarrayReader 🌐#
This is where ☯ zen3geo comes in. We’ll be using the
zen3geo.datapipes.rioxarray.RioXarrayReaderIterDataPipe class, or
rather, the short alias zen3geo.datapipes.RioXarrayReader.
Confusingly, there are two ways or forms of applying RioXarrayReader,
a class-based method and a functional method.
# Using class constructors
dp_rioxarray = zen3geo.datapipes.RioXarrayReader(source_datapipe=dp)
dp_rioxarray
RioXarrayReaderIterDataPipe
# Using functional form (recommended)
dp_rioxarray = dp.read_from_rioxarray()
dp_rioxarray
RioXarrayReaderIterDataPipe
Note that both ways are equivalent (they produce the same IterDataPipe output), but the latter (functional) form is preferred, see also https://pytorch.org/data/0.4/tutorial.html#registering-datapipes-with-the-functional-api
What if you don’t want the whole Sentinel-2 scene at the full 10m resolution?
Since we’re using Cloud-Optimized GeoTIFFs, you could set an overview_level
(following https://corteva.github.io/rioxarray/stable/examples/COG.html).
dp_rioxarray_zoom3 = dp.read_from_rioxarray(overview_level=3)
dp_rioxarray_zoom3
RioXarrayReaderIterDataPipe
Extra keyword arguments will be handled by rioxarray.open_rasterio()
or rasterio.open().
Note
Other DataPipe classes/functions can be stacked or joined to this basic GeoTIFF reader. For example, clipping by bounding box or reprojecting to a certain Coordinate Reference System. If you would like to implement this, check out the Contributing Guidelines to get started!
2️⃣ Loop through DataPipe ⚙️#
A DataPipe describes a flow of information. Through a series of steps it goes, as one piece comes in, another might follow.
Basic iteration ♻️#
At the most basic level, you could iterate through the DataPipe like so:
it = iter(dp_rioxarray_zoom3)
dataarray = next(it)
dataarray
<xarray.DataArray (band: 3, y: 687, x: 687)>
[1415907 values with dtype=uint8]
Coordinates:
  * band         (band) int64 1 2 3
  * x            (x) float64 3.001e+05 3.002e+05 ... 4.096e+05 4.097e+05
  * y            (y) float64 2e+05 1.998e+05 1.996e+05 ... 9.048e+04 9.032e+04
    spatial_ref  int64 0
Attributes:
    _FillValue:    0.0
    scale_factor:  1.0
add_offset: 0.0Or if you’re more familiar with a for-loop, here it is:
for dataarray in dp_rioxarray_zoom3:
    print(dataarray)
    # Run model on this data batch
StreamWrapper<<xarray.DataArray (band: 3, y: 687, x: 687)>
[1415907 values with dtype=uint8]
Coordinates:
  * band         (band) int64 1 2 3
  * x            (x) float64 3.001e+05 3.002e+05 ... 4.096e+05 4.097e+05
  * y            (y) float64 2e+05 1.998e+05 1.996e+05 ... 9.048e+04 9.032e+04
    spatial_ref  int64 0
Attributes:
    _FillValue:    0.0
    scale_factor:  1.0
    add_offset:    0.0>
Into a DataLoader 🏋️#
For the deep learning folks, you might need one extra step.
The xarray.DataArray needs to be converted to a tensor.
In the Pytorch world, that can happen via torch.as_tensor().
def fn(da):
    return torch.as_tensor(da.data)
Using torchdata.datapipes.iter.Mapper (functional name: map),
we’ll apply the tensor conversion function to each dataarray in the DataPipe.
dp_tensor = dp_rioxarray_zoom3.map(fn=fn)
dp_tensor
MapperIterDataPipe
Finally, let’s put our DataPipe into a torch.utils.data.DataLoader!
dataloader = torch.utils.data.DataLoader(dataset=dp_tensor)
for batch in dataloader:
    tensor = batch
    print(tensor)
tensor([[[[ 46,  29,  34,  ..., 241, 246, 255],
          [ 83,  73,  66,  ..., 248, 255, 251],
          [ 53,  43,  55,  ..., 246, 247, 243],
          ...,
          [101, 101, 104,  ...,  78, 179,  83],
          [ 99, 103, 105,  ...,  68,  60,  45],
          [ 95, 103, 102,  ...,  50,  34,  42]],

         [[ 58,  24,  44,  ..., 255, 255, 255],
          [ 60,  51,  57,  ..., 255, 255, 254],
          [ 47,  22,  47,  ..., 255, 255, 255],
          ...,
          [110, 111, 114,  ...,  95, 189,  87],
          [110, 113, 113,  ...,  85,  62,  48],
          [108, 112, 112,  ...,  62,  60,  62]],

         [[ 42,  22,  29,  ..., 255, 255, 255],
          [ 43,  41,  39,  ..., 255, 255, 254],
          [ 35,  30,  37,  ..., 255, 255, 255],
          ...,
          [ 82,  82,  83,  ...,  74, 174,  57],
          [ 82,  84,  84,  ...,  57,  46,  28],
          [ 80,  83,  82,  ...,  37,  31,  31]]]], dtype=torch.uint8)
And so it begins 🌄
That’s all 🎉! For more information on how to use DataPipes, check out:
If you have any questions 🙋, feel free to ask us anything at https://github.com/weiji14/zen3geo/discussions or visit the Pytorch forums at https://discuss.pytorch.org/c/data/37.
Cheers!